Sherry's blog


  • 首页

  • 标签

  • 分类

  • 归档

判断类型

发表于 2020-03-20 | 分类于 基础 , 判断类型

JS判断类型的方式

  • typeof

    1
    2
    3
    4
    5
    6
    7
    8
    9
    10
    11
    typeof ''            // 'string'
    typeof {} // 'object'
    typeof null // 'object'
    typeof [] // 'object'
    typeof 5 // 'number'
    typeof NaN // 'number'
    typeof (() => {}) // 'function'
    typeof true // 'boolean'
    typeof undefined // 'undefined'
    typeof Symbol() // 'symbol'
    typeof 42n // 'bigint'

Symbol,可以用作对象中的键。BigInt,一种方法来表示大于 253 - 1 的整数。

在 JavaScript 最初的实现中,JavaScript 中的值是由一个表示类型的标签和实际数据值表示的。对象的类型标签是 0。由于 null 代表的是空指针(大多数平台下值为 0x00),因此,null 的类型标签是 0,typeof null 也因此返回 "object"。

new 操作符: 除 Function 外的所有构造函数的类型都是 ‘object’

1
2
3
4
5
6
7
8
9
var str = new String('String');
var num = new Number(100);

typeof str; // 返回 'object'
typeof num; // 返回 'object'

var func = new Function();

typeof func; // 返回 'function'

加入了块级作用域的 let 和 const 之后,在其被声明之前对块中的 let 和 const 变量使用 typeof 会抛出一个 ReferenceError。

1
2
3
4
5
6
7
typeof newLetVariable; // ReferenceError
typeof newConstVariable; // ReferenceError
typeof newClass; // ReferenceError

let newLetVariable;
const newConstVariable = 'hello';
class newClass{};
  • Instanceof

instanceof 运算符用来检测 constructor.prototype是否存在于参数 object 的原型链上。

1
2
3
4
5
6
7
8
9
10
11
12
13
14
15
16
17
18
19
20
21
22
23
24
25
26
27
28
29
30
31
32
33
34
35
var a = {}
a instanceof Object // true
var b = []
b instanceof Array // true
var c = 7
c instanceof Number // false
c = new Number(7) //__proto__: Number
// [[PrimitiveValue]]: 7
c instanceof Number // true
var d = ''
d instanceof String // false
d = new String('')
/*
length: 0
__proto__: String
[[PrimitiveValue]]: ""
*/
d instanceof String // true

null instanceof Object // false

function Car(make, model, year) {
this.make = make;
this.model = model;
this.year = year;
}
var mycar = new Car("Honda", "Accord", 1998);
var a = mycar instanceof Car; // true
var b = mycar instanceof Object; // true

// 注意,检测对象不是某个构造函数的实例
if (!(mycar instanceof Car)) {
// Do something, like mycar = new Car(mycar)
}
if (!mycar instanceof Car) {} // 这段代码永远会得到 false(!mycar 将在 instanceof 之前被处理,所以你总是在验证一个布尔值是否是 Car 的一个实例)。
  • constructor
1
2
3
4
({}).constructor === Object // true
('').constructor === String // true
([]).constructor === Array // true
(7).constructor === Number // true
  • Object.prototype.toString
1
2
3
4
5
6
Object.prototype.toString.call(null) // "[object Null]"
Object.prototype.toString.call('') // "[object String]"
Object.prototype.toString.call(7) // "[object Number]"
Object.prototype.toString.call([]) // "[object Array]"
Object.prototype.toString.call(undefined) // "[object Undefined]"
Object.prototype.toString.call(function () {}) // "[object Function]"

JavaScript 标准文档中定义: [[Class]] 的值只可能是下面字符串中的一个: Arguments, Array, Boolean, Date, Error, Function, JSON, Math, Number, Object, RegExp, String.

为什么是Object.prototype.toString?而不是obj.toString?

因为toString可能被改写。

  • 其他方法
1
Array.isArray([]) // true

vue-storybook-1

发表于 2019-08-13 | 分类于 vue

在vue项目中引入storybook

之前使用了vue-cli生成项目,并且选择了typescript,那么,要怎么引入storybook呢?

手动安装storybook

官网上有storybook的cli,但因为我已经存在一个vue项目,所有使用手动安装:

1
npm install @storybook/vue --save-dev

然后还需要一些loader,因为我们用是ts,而且有一些loader在vue项目生成时已经安装,所有只需安装没有的部分(可以在使用下一步命令启动storybook后看漏了什么loader)

1
npm i babel-preset-vue awesome-typescript-loader -D

npm script

在package.json中添加npm命令

1
2
3
"scripts": {
"storybook": "start-storybook"
},

添加config file

在项目根目录添加文件.storybook/config.js

1
2
3
4
5
6
7
import { configure } from '@storybook/vue'

function loadStories() {
require('../src/stories/index.ts')
}

configure(loadStories, module)

除此之外,还必须添加webpack.config.js,参考,来处理对ts的转化,不然像.vue里的@Component等,都会报Unexpected character ‘@’

1
2
3
4
5
6
7
8
9
10
11
12
13
14
15
16
17
18
const vueConfig = require('@vue/cli-service/webpack.config.js');

module.exports = async ({ config }) => {
return {
...config,
resolve: {
...vueConfig.resolve,
alias: {
...vueConfig.resolve.alias,
'vue$': 'vue/dist/vue.esm.js' // if you need it
},
},
module: {
...vueConfig.module,
rules: vueConfig.module.rules,
},
}
}

编写stories

在src文件夹下新建/stories/index.ts(根目录也可以)

1
2
3
4
5
6
7
8
9
10
import { storiesOf } from '@storybook/vue';
import MyButton from '../components/MyButton.vue';

storiesOf('Button', module)
.add('with text', () => '<my-button>with text</my-button>')
.add('with emoji', () => '<my-button>😀 😎 👍 💯</my-button>')
.add('as a component', () => ({
components: { MyButton },
template: '<my-button :rounded="true">rounded</my-button>',
}));

MyButton组件就自己随便写写就好。

然后发现tslint有提示@storybook/vue没有定义的声明types,所以要安装

1
npm install @types/storybook__vue -D

这样storybook就能跑起来了。

multi-git-account

发表于 2019-08-09 | 分类于 git

创建多个git账号&修改git提交历史

因公司使用gitlab,账号为公司邮箱,自己也有个GitHub,账号为私人邮箱,要怎么做才能使用不同的账号push不同的仓库呢?

生成不同的ssh key:

1
ssh-keygen -t rsa -f ~/.ssh/id_rsa_github -C "email@email.com"

我把公司的命名为id_rsa,github的加了个后缀,然后将key复制到网站上。

1
vi id_rsa_github.pub

相信之前肯定设置了global的email和name,网上大部分说法都是讲global的设置删除,但也可以不删,只是在相对应的gitlab仓库下设置gitlab账号就好(我是global使用github账号,因为公司项目较少,需设置的仓库较少)

1
2
3
4
5
6
7
// 全局
git config --global user.email githubEmail
git config --global user.name ihgSherryLee

//gitlab项目
git config user.email gitlabEmail
git config user.name gitlabName

一旦使用其他账号commit/push过,想要修改git的提交记录(因为github的contribution不好看),可以用脚本来做:

1
2
3
4
5
6
7
8
9
10
11
12
13
14
15
16
17
git filter-branch --env-filter '

OLD_EMAIL="oldEmail@email.com"
CORRECT_NAME="name"
CORRECT_EMAIL="email"

if [ "$GIT_COMMITTER_EMAIL" = "$OLD_EMAIL" ]
then
export GIT_COMMITTER_NAME="$CORRECT_NAME"
export GIT_COMMITTER_EMAIL="$CORRECT_EMAIL"
fi
if [ "$GIT_AUTHOR_EMAIL" = "$OLD_EMAIL" ]
then
export GIT_AUTHOR_NAME="$CORRECT_NAME"
export GIT_AUTHOR_EMAIL="$CORRECT_EMAIL"
fi
' --tag-name-filter cat -- --branches --tags

存储为项目根目录下email.sh(第一次覆盖更新时)

1
2
chmod +x email.sh 
./email.sh

若要在同一个项目再覆盖一次,执行后回提示

1
2
3
Cannot create a new backup.
A previous backup already exists in refs/original/
Force overwriting the backup with -f

要把refs/original/删掉:

1
2
3
4
5
rm -rf .git/refs/original/
或
git filter-branch -f --index-filter 'git rm --cached --ignore-unmatch Rakefile' HEAD

./email.sh

这样就能修改成功,然后push

1
2
git push origin --force --all
git push origin --force --tags

QA-node-version

发表于 2019-07-31 | 分类于 汇总

Vue cli build 遇到的问题

使用vue-cli 3打包时,出现了问题:

1
2
3
4
5
6
7
8
9
10
11
12
13
14
15
16
17
18
19
20
21
22
23
24
25
26
27
vue-cli-service build --mode dev

/node_modules/_open@6.4.0@open/index.js:16
const wslToWindowsPath = async path => {
^^^^

SyntaxError: Unexpected identifier
at createScript (vm.js:56:10)
at Object.runInThisContext (vm.js:97:10)
at Module._compile (module.js:549:28)
at Object.Module._extensions..js (module.js:586:10)
at Module.load (module.js:494:32)
at tryModuleLoad (module.js:453:12)
at Function.Module._load (module.js:445:3)
at Module.require (module.js:504:17)
at require (internal/module.js:20:19)
at Object.<anonymous> (/root/.jenkins/workspace/dev-privatization-web-edap/node_modules/_@vue_cli-shared-utils@3.9.0@@vue/cli-shared-utils/lib/openBrowser.js:9:14)
npm ERR! code ELIFECYCLE
npm ERR! errno 1
npm ERR! privatization-information-search@0.1.0 build:dev: `vue-cli-service build --mode dev`
npm ERR! Exit status 1
npm ERR!
npm ERR! Failed at the privatization-information-search@0.1.0 build:dev script.
npm ERR! This is probably not a problem with npm. There is likely additional logging output above.

npm ERR! A complete log of this run can be found in:
npm ERR! /root/.npm/_logs/2019-07-31T03_09_18_026Z-debug.log

可是在本地打包时却没有发现这个问题,在运维脚本打包的服务器上却出现了,然后在github的某个库的issue上找到了答案:

Nice write up @pm-radu, also seeing this issue here.

It appears the two options for resolving it are to modify the project’s package.json on line 48 to specify a version of Node.js greater than 7.6 when support was added for async/await. Additionally the dependency opn is now called open and should be updated.

Alternately if maintaining support for the oldest versions of Node is a priority, line 24 could be modified to specify the last opn version without async/await which is 5.4.0.

服务器node版本是6,而async/await语法需node > 7.6,所以报错了。

vue-unite-test

发表于 2019-07-22 | 分类于 单元测试

hexo-seo

发表于 2019-07-12 | 分类于 hexo

单单用github page写个blog就够了吗,可是别都google不到你的文章,只是写给自己看吗?为blog加入seo,这样,别人就能google到你的文章。

安装插件生成sitemap
1
2
npm install hexo-generator-sitemap --save // 传统的
npm install hexo-generator-baidu-sitemap --save // 百度的
修改站点配置文件

在_config.yml中,加入

1
2
3
4
sitemap: 
path: sitemap.xml
baidusitemap:
path: baidusitemap.xml

并将原url改成自己的blog地址,然后执行hexo g,在public生成sitemap.xml和baidusitemap.xml,打开文件发现就是各blog地址的url。

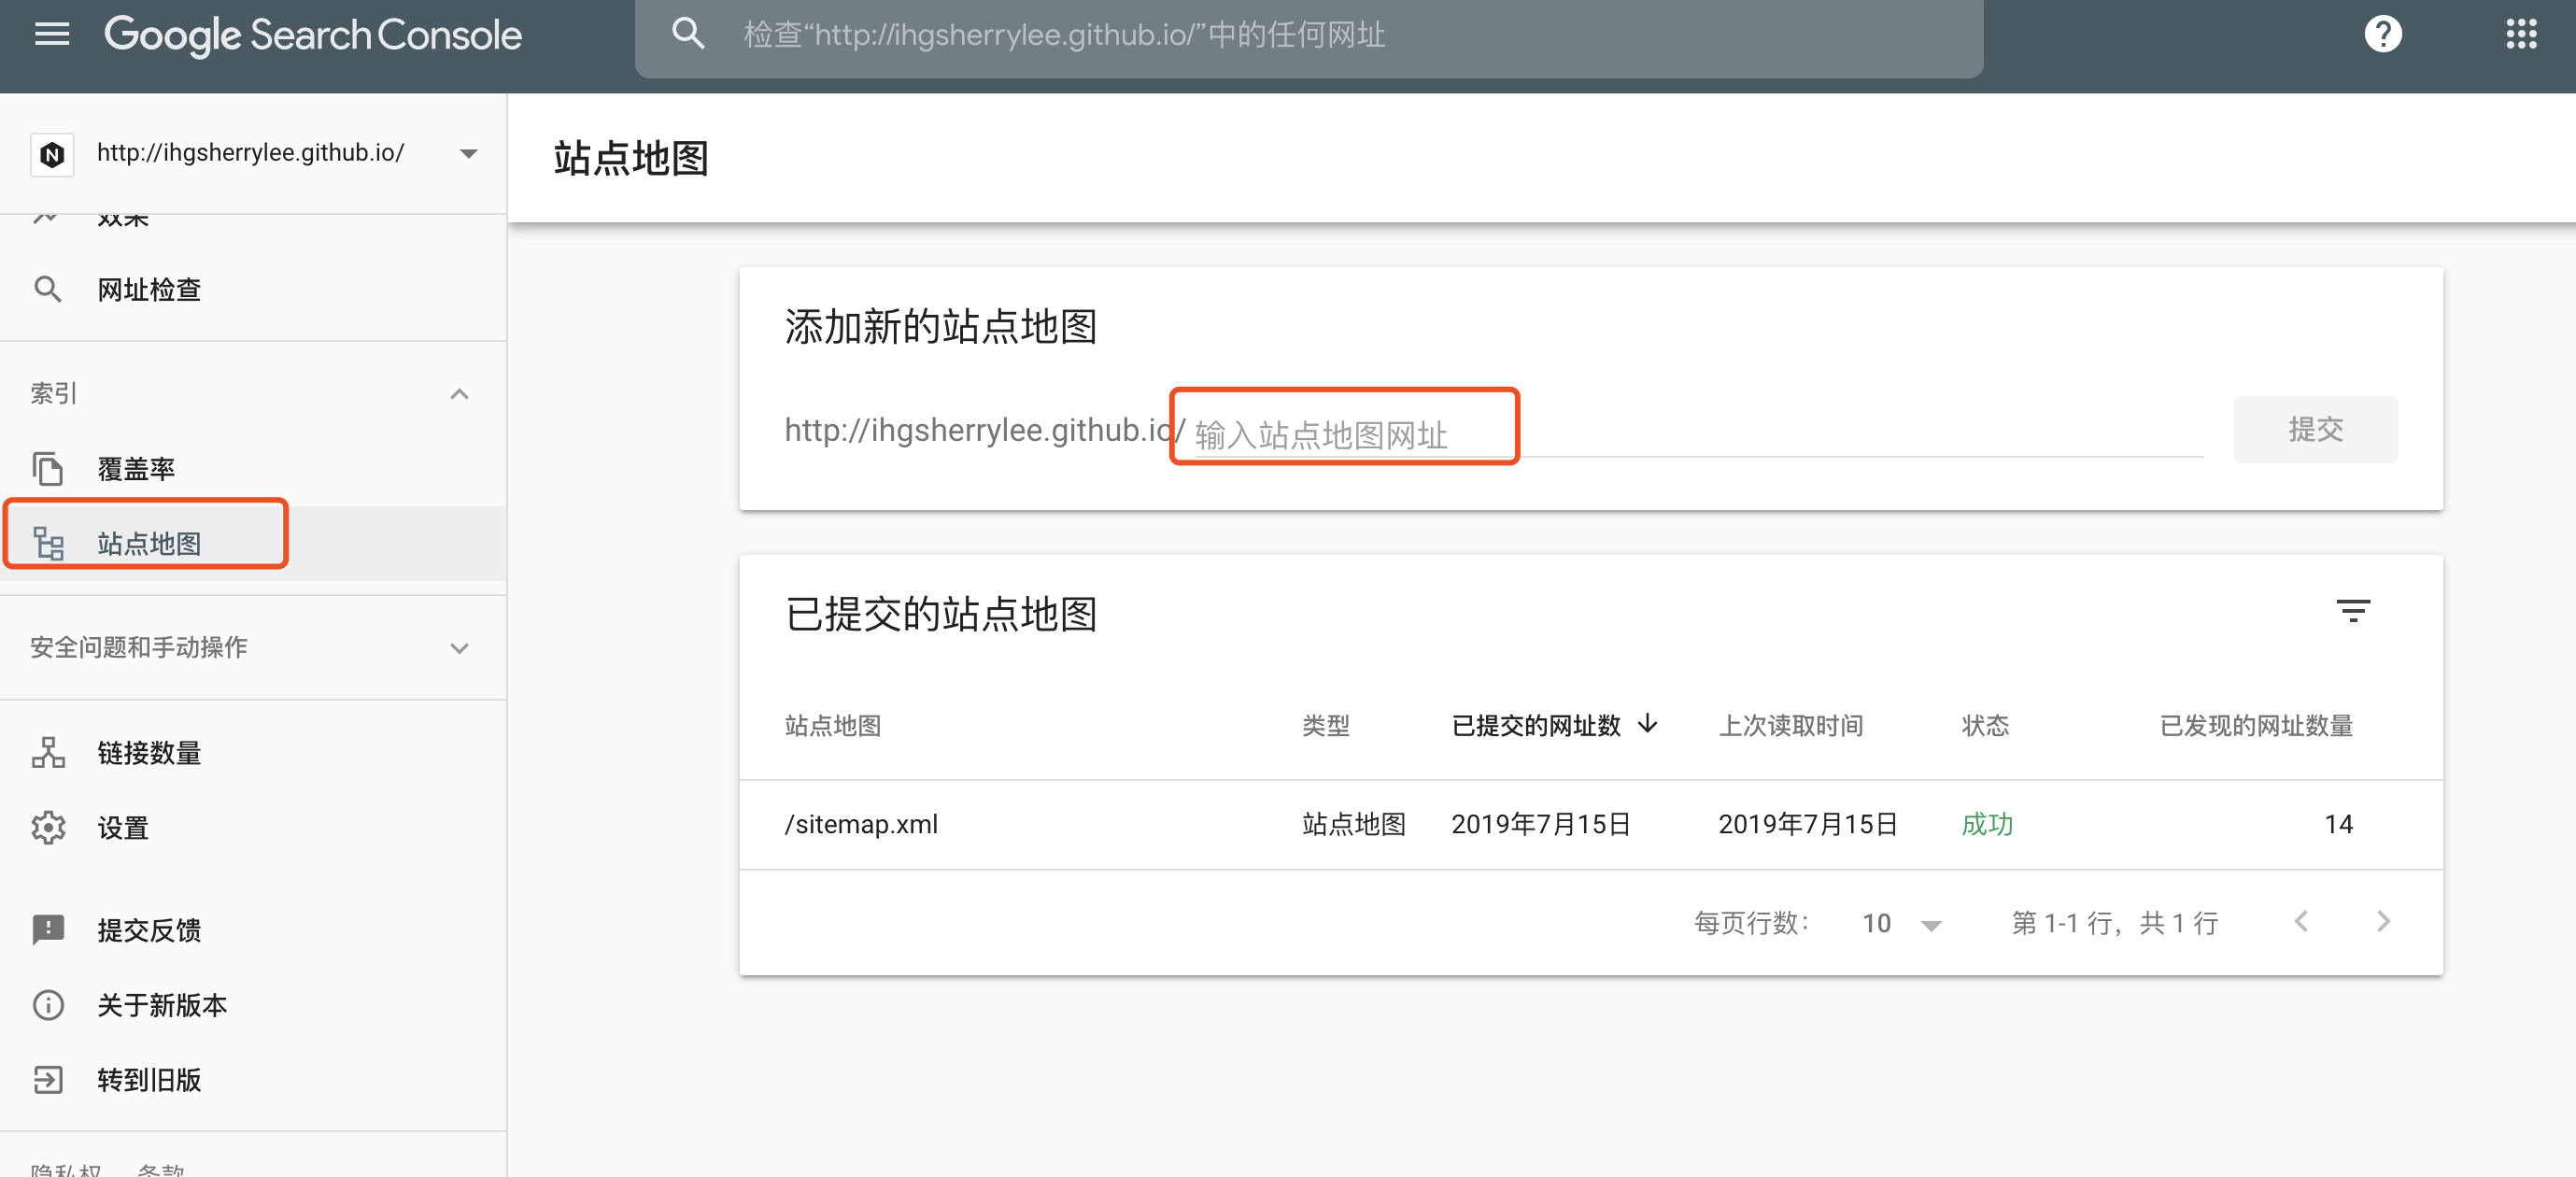
然后提交站点到google(和百度)

选择网址前缀,输入blog地址,然后就是所有权验证,有多种验证方式,这里采用推荐的html验证:

下载html验证文件,加入到/source文件夹,然后编辑验证文件,加入

1
2
layout: false
---

让hexo不处理这个文件,并且不生成这个文件的sitemap,然后执行

1
2
3
hexo clean
hexo g
hexo d

部署完后在google点击验证,即可验证通过。然后提交站点地图

next主题已经配置了自动推送百度的代码,_config_yml:

1
baidu_push: true

即可。

优化url目录

可是这样还有一个问题,hexo生成的文章链接是使用年/月/日这种文件目录结构的,这样对搜索爬虫并不友好,url链接超过了3层,所以,我们要将url简化,安装:

A Hexo plugin to generate static post link based on post titles.

1
npm install hexo-abbrlink --save

然后配置_config.yml里permalink相关配置

1
2
3
4
5
6
permalink: :year/:month/:day/:title/ // 原permalink
permalink: posts/:abbrlink/ // 修改后
# abbrlink config
abbrlink:
alg: crc32 #support crc16(default) and crc32
rep: hex #support dec(default) and hex

Sample

The generated link will look like the following:

1
2
3
4
5
6
7
8
9
10
11
> crc16 & hex
> https://post.zz173.com/posts/66c8.html
>
> crc16 & dec
> https://post.zz173.com/posts/65535.html
> crc32 & hex
> https://post.zz173.com/posts/8ddf18fb.html
>
> crc32 & dec
> https://post.zz173.com/posts/1690090958.html
>

然后重新编译发布,/posts/82d92ad4/就是类似生成的文章地址。

参考链接

Hexo博客之后续SEO优化

Hexo博客Next主题SEO优化方法)

Vue技术揭秘之virtual dom

发表于 2019-07-10 | 分类于 Vue

什么是虚拟dom?

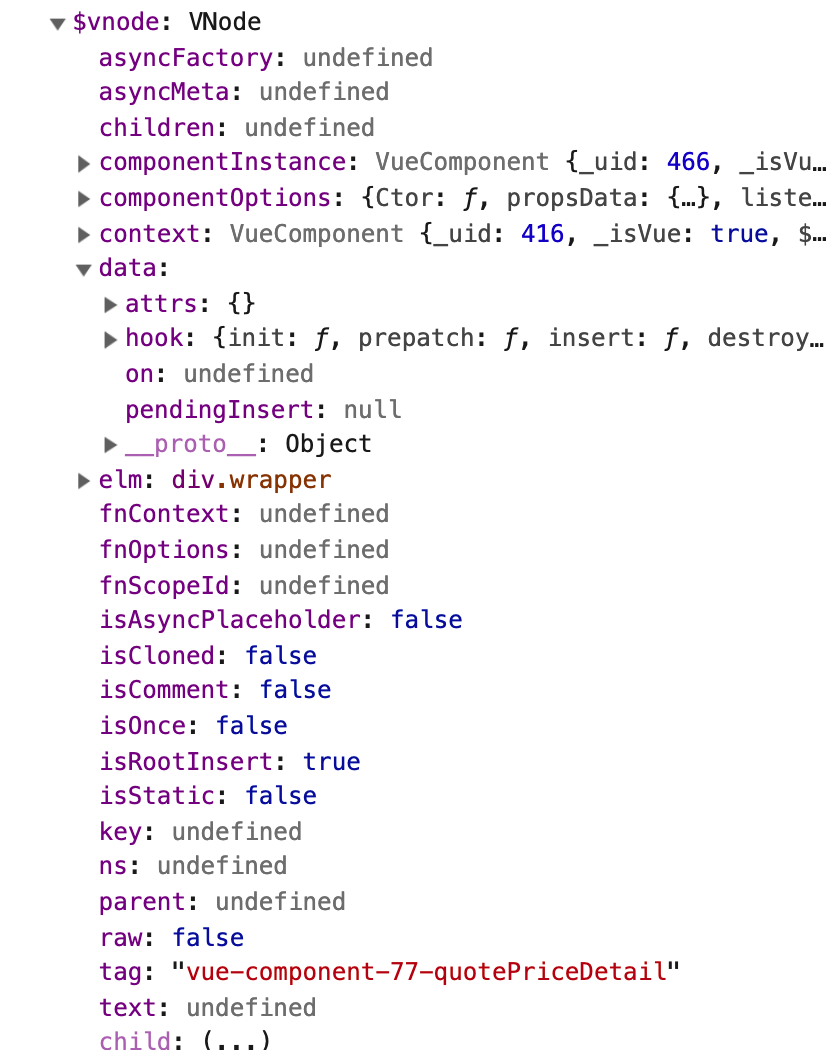
它所包含的信息会告诉 Vue 页面上需要渲染什么样的节点,包括及其子节点的描述信息。我们把这样的节点描述为“虚拟节点 (virtual node)”,也常简写它为“VNode”。“虚拟 DOM”是我们对由 Vue 组件树建立起来的整个 VNode 树的称呼。

看下Vnode的定义,在/core/vdom/vnode.js

1
2
3
4
5
6
7
8
9
10
11
12
13
14
15
16
17
18
19
20
21
22
23
24
25
26
27
28
29
30
31
32
33
34
35
36
37
38
39
40
41
42
43
44
45
46
47
48
49
50
51
52
53
54
55
56
57
58
59
60
61
62
63
64
65
66
67
68
69
70
export default class VNode {
tag: string | void;
data: VNodeData | void;
children: ?Array<VNode>;
text: string | void;
elm: Node | void;
ns: string | void;
context: Component | void; // rendered in this component's scope
key: string | number | void;
componentOptions: VNodeComponentOptions | void;
componentInstance: Component | void; // component instance
parent: VNode | void; // component placeholder node

// strictly internal
raw: boolean; // contains raw HTML? (server only)
isStatic: boolean; // hoisted static node
isRootInsert: boolean; // necessary for enter transition check
isComment: boolean; // empty comment placeholder?
isCloned: boolean; // is a cloned node? cloneVNode(vnode)为true
isOnce: boolean; // is a v-once node?
asyncFactory: Function | void; // async component factory function
asyncMeta: Object | void;
isAsyncPlaceholder: boolean;
ssrContext: Object | void;
fnContext: Component | void; // real context vm for functional nodes
fnOptions: ?ComponentOptions; // for SSR caching
devtoolsMeta: ?Object; // used to store functional render context for devtools
fnScopeId: ?string; // functional scope id support

constructor (
tag?: string, // vue前缀 + component name
data?: VNodeData, // attr,hook
children?: ?Array<VNode>,
text?: string,
elm?: Node, // dom node
context?: Component, // vue component实例,包括一些slot,el,store,vnode等
componentOptions?: VNodeComponentOptions,
asyncFactory?: Function
) {
this.tag = tag
this.data = data
this.children = children
this.text = text
this.elm = elm
this.ns = undefined
this.context = context
this.fnContext = undefined
this.fnOptions = undefined
this.fnScopeId = undefined
this.key = data && data.key
this.componentOptions = componentOptions
this.componentInstance = undefined
this.parent = undefined
this.raw = false
this.isStatic = false
this.isRootInsert = true
this.isComment = false
this.isCloned = false
this.isOnce = false
this.asyncFactory = asyncFactory
this.asyncMeta = undefined
this.isAsyncPlaceholder = false
}

// DEPRECATED: alias for componentInstance for backwards compat.
/* istanbul ignore next */
get child (): Component | void {
return this.componentInstance
}
}

image-20190710090921581

关于nrm的一些命令

发表于 2019-07-06 | 分类于 nrm

nrm是什么:

1
2
> nrm` can help you easy and fast switch between different npm registries, now include: `npm`, `cnpm`, `taobao`, `nj(nodejitsu)
>

其实就是帮助快速切换npm镜像包,在没有安装之前,最常用的设置镜像的命令是:

1
2
3
4
5
6
7
8
9
10
11
npm set registry https://registry.npm.taobao.org/

// 备忘 其余命令
// 获取某项配置
npm config get registry

// 删除registry
npm config delete registry

// 直接编辑config
npm config edit

如果需要经常切换镜像,每次都要set,如果有个工具帮你记住各种不同的镜像元,且能快速切换,是不是就很好呢?那nrm就是这样一个工具。

安装:

1
npm install -g nrm

查看默认的镜像列表(*表示当前镜像地址)

1
2
3
4
5
6
  npm ---- https://registry.npmjs.org/
cnpm --- http://r.cnpmjs.org/
* taobao - https://registry.npm.taobao.org/
nj ----- https://registry.nodejitsu.com/
npmMirror https://skimdb.npmjs.com/registry/
edunpm - http://registry.enpmjs.org/

直接use即可切换

1
2
3
nrm use cnpm

Registry has been set to: http://r.cnpmjs.org/

增加镜像

1
nrm add name url

删除镜像

1
nrm del name

electron preload 的用法

发表于 2019-05-07 | 分类于 electron

在electron中,主进程和渲染进程进行通信,可以通过ipc模块发送和接收信息。

渲染器进程

1
2
3
4
5
6
7
8
9
10
11
12
const ipc = require('electron').ipcRenderer

const asyncMsgBtn = document.getElementById('async-msg')

asyncMsgBtn.addEventListener('click', function () {
ipc.send('asynchronous-message', 'ping')
})

ipc.on('asynchronous-reply', function (event, arg) {
const message = `异步消息回复: ${arg}`
document.getElementById('async-reply').innerHTML = message
})

主进程

1
2
3
4
5
const ipc = require('electron').ipcMain

ipc.on('asynchronous-message', function (event, arg) {
event.sender.send('asynchronous-reply', 'pong')
})

但是,一旦我们直接load一个网址,渲染的不是一个node运行时的html,而是一个webpack打包后的静态页面,我们不可能从网址的静态页面中往主进程发送消息或接受主进程的消息。这个时候,preload就排上用场了。

Preload:在页面运行其他脚本之前预先加载指定的脚本 无论页面是否集成Node, 此脚本都可以访问所有Node API 脚本路径为文件的绝对路径。 当 node integration 关闭时, 预加载的脚本将从全局范围重新引入node的全局引用标志。

未命名

发表于 2019-04-02

你不知道的JavaScript(下)

2.4.1 对象属性赋值模式

1
2
var {x:x, y:y, z:z} = obj
var {x, y, z} = obj

{x,…}是省略掉了x:部分还是:x部分?时间上是省略了x:部分

12

Sherry Lee

16 日志
11 分类
21 标签
© 2020 Sherry Lee
由 Hexo 强力驱动
|
主题 — NexT.Muse v5.1.4